trino-iceberg
|
This is a condensed form of the data-lakehouse-iceberg-trino-spark demo focusing on using the lakehouse to store and modify data. It focuses on the Trino and Iceberg integration and should run on you local workstation. If you are interested in a more complex lakehouse setup, please have a look at the data-lakehouse-iceberg-trino-spark demo. |
|
This guide assumes that you already have the demo |
This demo will
-
Install the required Stackable operators
-
Spin up the following data products
-
Trino: A fast distributed SQL query engine for big data analytics that helps you explore your data universe. This demo uses it to enable SQL access to the data
-
-
Create multiple data lakehouse tables using Apache Iceberg and data from the TPC-H dataset.
-
Run some queries to show the benefits of Iceberg
List deployed Stackable services
To list the installed installed Stackable services run the following command:
$ stackablectl services list --all-namespaces
┌─────────┬──────────────┬───────────┬──────────────────────────────────────────────┬─────────────────────────────────────────┐
│ Product ┆ Name         ┆ Namespace ┆ Endpoints                                    ┆ Extra infos                             │
╞═════════╪══════════════╪═══════════╪══════════════════════════════════════════════╪═════════════════════════════════════════╡
│ hive    ┆ hive-iceberg ┆ default   ┆ hive                172.18.0.4:30637         ┆                                         │
│         ┆              ┆           ┆ metrics             172.18.0.4:30176         ┆                                         │
├╌╌╌╌╌╌╌╌╌┼╌╌╌╌╌╌╌╌╌╌╌╌╌╌┼╌╌╌╌╌╌╌╌╌╌╌┼╌╌╌╌╌╌╌╌╌╌╌╌╌╌╌╌╌╌╌╌╌╌╌╌╌╌╌╌╌╌╌╌╌╌╌╌╌╌╌╌╌╌╌╌╌╌┼╌╌╌╌╌╌╌╌╌╌╌╌╌╌╌╌╌╌╌╌╌╌╌╌╌╌╌╌╌╌╌╌╌╌╌╌╌╌╌╌╌┤
│ opa     ┆ opa          ┆ default   ┆ http                http://172.18.0.2:32470  ┆                                         │
├╌╌╌╌╌╌╌╌╌┼╌╌╌╌╌╌╌╌╌╌╌╌╌╌┼╌╌╌╌╌╌╌╌╌╌╌┼╌╌╌╌╌╌╌╌╌╌╌╌╌╌╌╌╌╌╌╌╌╌╌╌╌╌╌╌╌╌╌╌╌╌╌╌╌╌╌╌╌╌╌╌╌╌┼╌╌╌╌╌╌╌╌╌╌╌╌╌╌╌╌╌╌╌╌╌╌╌╌╌╌╌╌╌╌╌╌╌╌╌╌╌╌╌╌╌┤
│ trino   ┆ trino        ┆ default   ┆ coordinator-metrics 172.18.0.2:32402         ┆                                         │
│         ┆              ┆           ┆ coordinator-https   https://172.18.0.2:31605 ┆                                         │
├╌╌╌╌╌╌╌╌╌┼╌╌╌╌╌╌╌╌╌╌╌╌╌╌┼╌╌╌╌╌╌╌╌╌╌╌┼╌╌╌╌╌╌╌╌╌╌╌╌╌╌╌╌╌╌╌╌╌╌╌╌╌╌╌╌╌╌╌╌╌╌╌╌╌╌╌╌╌╌╌╌╌╌┼╌╌╌╌╌╌╌╌╌╌╌╌╌╌╌╌╌╌╌╌╌╌╌╌╌╌╌╌╌╌╌╌╌╌╌╌╌╌╌╌╌┤
│ minio   ┆ minio        ┆ default   ┆ http                http://172.18.0.2:30357  ┆ Third party service                     │
│         ┆              ┆           ┆ console-http        http://172.18.0.2:30310  ┆ Admin user: admin, password: adminadmin │
└─────────┴──────────────┴───────────┴──────────────────────────────────────────────┴─────────────────────────────────────────┘|
When a product instance has not finished starting yet, the service will have no endpoint. Starting all the product instances might take a considerable amount of time depending on your internet connectivity. In case the product is not ready yet a warning might be shown. |
MinIO
You can view the available buckets as well as objects (think of files) as described in the data-lakehouse-iceberg-trino-spark demo.
Connect to Trino
Have a look at documentation on how to connect with DBeaver.
As a alternative you can use trino-cli by running
java -jar ~/Downloads/trino-cli-396-executable.jar --user admin --insecure --password --server https://172.18.0.3:31250Make sure to replace the server endpoint with the endpoint listed in the stackablectl services list output.
Create testdata
Create Schema
First of you need to create a schema in the lakehouse to store the testdata
CREATE SCHEMA lakehouse.tpch WITH (location = 's3a://lakehouse/tpch');Afterwards you can set the context to the freshly created schema, so that you don’t need to write out every table as lakehouse.tpch.<table-name> but instead can use <table-name> directly.
use lakehouse.tpch;Create tables
In order to have some testdata to work with you can use the TPC-H dataset. Trino offers a special TPCH connector which generates the testdata deterministically on the fly.
You can list the tables that are part of the dataset using
show tables in tpch.sf5;

  Table
----------
 customer
 lineitem
 nation
 orders
 part
 partsupp
 region
 supplier
(8 rows)
The dataset comes with different scale factors.
This demo is intended to run on a Laptop, so it starts with a scale factor of 5 (hence the sf5 in the above query).
If you have a sufficiently large S3 and Trino deployed, you can easily re-run the statements below with a different scale factor.
This demo has been tested up to a scale factor of 10000, but you can choose any scale in between or even more if desired.
If you have decided on your scale factor run the queries below to create tables in the lakehouse and propagate them with testdata. Depending on the scale factor this can take a considerable amount of time (the queries are ordered by size ascending). The progress of the query can be tracked in the WebUI.
create table nation as select * from tpch.sf5.nation;
create table region as select * from tpch.sf5.region;
create table part as select * from tpch.sf5.part;
create table partsupp as select * from tpch.sf5.partsupp;
create table supplier as select * from tpch.sf5.supplier;
create table customer as select * from tpch.sf5.customer;
create table orders as select * from tpch.sf5.orders;
create table lineitem as select * from tpch.sf5.lineitem;
If you want to re-create the tables for any reason, you can drop them with the statements below
drop table if exists nation;
drop table if exists region;
drop table if exists part;
drop table if exists partsupp;
drop table if exists supplier;
drop table if exists customer;
drop table if exists orders;
drop table if exists lineitem;
drop table if exists customers_to_delete;
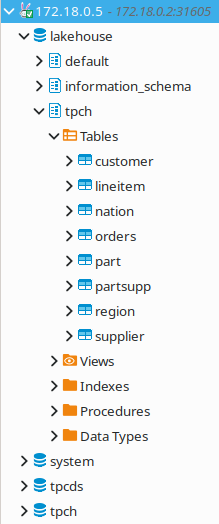
drop table if exists customers_to_prioritize;Afterwards your database overview in DBeaver should look like the following (you might need to refresh the contents with F5).
Explore data
Basic table information
To create a view giving some basic information about the tables please execute the statement below:
Statement to create table_information view
create or replace view table_information as
with
	table_infos as (
		select 'nation' as "table", (select count(*) from nation) as records, (select count(*) from "nation$snapshots") as snapshots
		union all select 'region' as "table", (select count(*) from region) as records, (select count(*) from "region$snapshots") as snapshots
		union all select 'part' as "table", (select count(*) from part) as records, (select count(*) from "part$snapshots") as snapshots
		union all select 'partsupp' as "table", (select count(*) from partsupp) as records, (select count(*) from "partsupp$snapshots") as snapshots
		union all select 'supplier' as "table", (select count(*) from supplier) as records, (select count(*) from "supplier$snapshots") as snapshots
		union all select 'customer' as "table", (select count(*) from customer) as records, (select count(*) from "customer$snapshots") as snapshots
		union all select 'orders' as "table", (select count(*) from orders) as records, (select count(*) from "orders$snapshots") as snapshots
		union all select 'lineitem' as "table", (select count(*) from lineitem) as records, (select count(*) from "lineitem$snapshots") as snapshots
	),
	table_file_infos as (
		select
			"table",
			sum(file_size_in_bytes) as size_in_bytes,
			count(*) as num_files,
			sum(file_size_in_bytes) / count(*) as avg_file_size,
			min(file_size_in_bytes) as min_file_size,
			max(file_size_in_bytes) as max_file_size
		from (
			select 'nation' as "table", * from "nation$files"
			union all select 'region' as "table", * from "region$files"
			union all select 'part' as "table", * from "part$files"
			union all select 'partsupp' as "table", * from "partsupp$files"
			union all select 'supplier' as "table", * from "supplier$files"
			union all select 'customer' as "table", * from "customer$files"
			union all select 'orders' as "table", * from "orders$files"
			union all select 'lineitem' as "table", * from "lineitem$files"
		)
		group by 1
	)
select
	i."table",
	i.records,
	format_number(f.size_in_bytes) as size_in_bytes,
	f.num_files,
	format_number(f.avg_file_size) as avg_file_size,
	format_number(f.min_file_size) as min_file_size,
	format_number(f.max_file_size) as max_file_size,
	i.snapshots,
	f.size_in_bytes / i.records as avg_record_size
from table_infos as i
left join table_file_infos as f
on i."table" = f."table";
Afterwards you can query the view using
select * from table_information order by records desc;

  table   | records  | size_in_bytes | num_files | avg_file_size | min_file_size | max_file_size | snapshots | avg_record_size
----------+----------+---------------+-----------+---------------+---------------+---------------+-----------+-----------------
 lineitem | 29999795 | 832M          |         7 | 119M          | 20.7M         | 220M          |         1 |              27
 orders   |  7500000 | 177M          |         3 | 59M           | 24.6M         | 95.3M         |         1 |              23
 partsupp |  4000000 | 144M          |         3 | 48.1M         | 11.8M         | 86.5M         |         1 |              36
 part     |  1000000 | 18.3M         |         1 | 18.3M         | 18.3M         | 18.3M         |         1 |              18
 customer |   750000 | 37.8M         |         1 | 37.8M         | 37.8M         | 37.8M         |         1 |              50
 supplier |    50000 | 2.39M         |         1 | 2.39M         | 2.39M         | 2.39M         |         1 |              47
 nation   |       25 | 1.84K         |         1 | 1.84K         | 1.84K         | 1.84K         |         1 |              73
 region   |        5 | 1.08K         |         1 | 1.08K         | 1.08K         | 1.08K         |         1 |             215
(8 rows)
Query the data
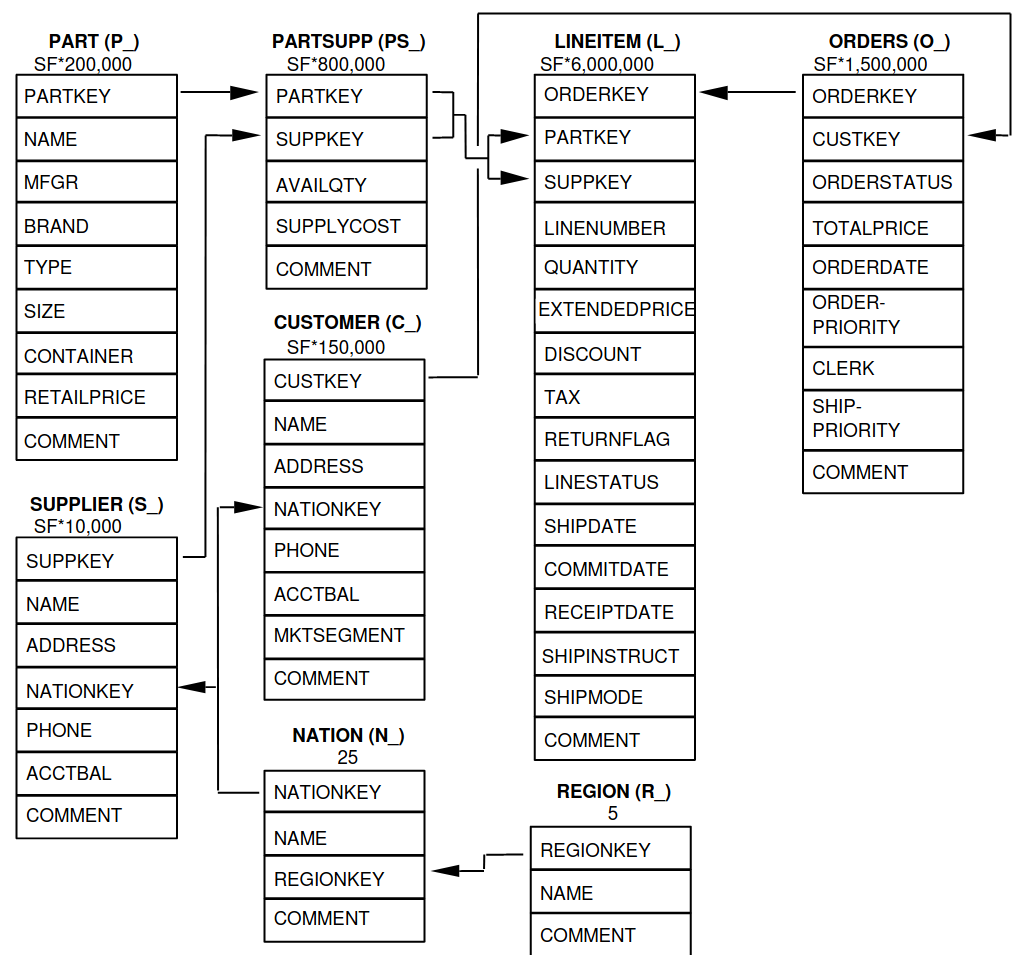
You can now use normal SQL to analyze the data. The relation of the tables to each other is explained in the TPC-H specification and looks as follows:
A sample query could look like
select
	returnflag,
	linestatus,
	sum(quantity) as sum_qty,
	sum(extendedprice) as sum_base_price,
	sum(extendedprice*(1-discount)) as sum_disc_price,
	sum(extendedprice*(1-discount)*(1+tax)) as sum_charge,
	avg(quantity) as avg_qty,
	avg(extendedprice) as avg_price,
	avg(discount) as avg_disc,
	count(*) as count_order
from lineitem
group by returnflag, linestatus
order by returnflag, linestatus;

 returnflag | linestatus |     sum_qty      |    sum_base_price     |    sum_disc_price     |      sum_charge       |      avg_qty       |     avg_price     |      avg_disc       | count_order
------------+------------+------------------+-----------------------+-----------------------+-----------------------+--------------------+-------------------+---------------------+-------------
 A          | F          | 3.77571137746E11 |  5.661718069977699E14 | 5.3786257473244656E14 | 5.5937697399894625E14 | 25.499847411525963 |   38237.283637033 | 0.05000115102912903 | 14806799886
 N          | F          |    9.856650789E9 | 1.4780258531756047E13 |  1.404124283043353E13 | 1.4602969210709287E13 |  25.50036232002822 | 38238.33833740861 | 0.05000485996120825 |   386529833
 N          | O          | 7.64999496883E11 | 1.1471184784585715E15 | 1.0897628058085238E15 | 1.1333538244374085E15 |  25.49998026123563 | 38237.27816446654 |  0.0499992984087016 | 30000003492
 R          | F          | 3.77567805489E11 |   5.66161080454589E14 |  5.378529622951691E14 | 5.5936684090849675E14 | 25.499861451613416 | 38236.91771651432 | 0.04999987724835343 | 14806661056
(4 rows)
It is inspired by the first query Q1 of the TPC-H benchmark.
The only difference is that the where shipdate ⇐ date '1998-12-01' - interval '[DELTA]' day clause was omitted to produce a full-table scan.
Row level deletes
So far the tables have been written once and only been read afterwards. Trino - in combination with Iceberg - can not only read data but also can do row-level deletes (deleting single rows out of a table). They achieve this by writing so-called "delete files", which mark rows for deletion.
First of imagine a situation where some customers want all of their data to be deleted.
You track all of the deletion requests in a dedicated table and have a nightly job that deletes all the data you have about the user.
Let’s create a table customers_to_delete containing a random sample of 1% of our user-base.
If you run with a larger scale factor you can leave the command unchanged.
create table customers_to_delete as select custkey from customer tablesample bernoulli (1);If you want to add new users to delete you can of course also insert new users to delete with the following query:
Statement to add new users to customers_to_delete
insert into customers_to_delete select custkey from customer tablesample bernoulli (1);Next step is the actual deletion process.
It starts with the lineitem table and deletes all items that are part of a orders from the customers to delete:
delete from lineitem where orderkey in (
	select orderkey from orders where custkey in (select custkey from customers_to_delete)
);
Afterwards all the orders can be safely deleted
delete from orders where custkey in (select custkey from customers_to_delete);As a last step the actual users get deleted.
delete from customer where custkey in (select custkey from customers_to_delete);Let’s check that we actually deleted the data.
Both of the queries below should return 0:
select count(*) from customer where custkey in (select custkey from customers_to_delete);
select count(*) from orders where custkey in (select custkey from customers_to_delete);
Row level updates
Iceberg does not only offer row level deletes but also updates.
Imagine a customer relocating that wants to update his address information.
He has the customer key 112501 and his name is Customer#000112501.
First of let’s see his current status.
select * from customer where custkey = 112501;

 custkey |        name        |    address    | nationkey |      phone      | acctbal | mktsegment |                                                  comment
---------+--------------------+---------------+-----------+-----------------+---------+------------+-----------------------------------------------------------------------------------------------------------
  112501 | Customer#000112501 | DWA,dNub2S5a0 |         3 | 13-503-907-7391 | 2490.91 | AUTOMOBILE | onic dependencies. slyly regular waters was among the final packages. asymptotes nod fluffily blithely un
Now let’s update the address
update customer set address='Karlsruhe' where custkey=112501;Afterwards the records should look the same as before, with the difference that address is set to Karlsruhe.
MERGE INTO statement
Trino also offers a MERGE INTO statement, which gives you great flexibility.
To show the usage, we want to pick some customers and give them VIP status.
We do this by giving all of their orders maximum priority.
We could easily do this with an UPDATE` statement, but here we want to add some additional requirements and use the MERGE INTO statement.
So we have the requirement to track the previous priority.
Inspect orders table first:
describe orders;
    Column     |  Type   | Extra | Comment
---------------+---------+-------+---------
 orderkey      | bigint  |       |
 custkey       | bigint  |       |
 orderstatus   | varchar |       |
 totalprice    | double  |       |
 orderdate     | date    |       |
 orderpriority | varchar |       |
 clerk         | varchar |       |
 shippriority  | integer |       |
 comment       | varchar |       |
(9 rows)
Now add a column orderpriority_prev that tracks the priority of the order before the VIP status.
alter table orders add column orderpriority_prev varchar;Now a sample record has the new column orderpriority_prev set to NULL.
select * from orders limit 1;
 orderkey | custkey | orderstatus | totalprice | orderdate  | orderpriority |      clerk      | shippriority |                               comment                               | orderpriority_prev
----------+---------+-------------+------------+------------+---------------+-----------------+--------------+---------------------------------------------------------------------+--------------------
 11827265 |  367454 | O           |   103958.7 | 1997-02-22 | 1-URGENT      | Clerk#000000162 |            0 | atelets cajole bold packages. carefully silent dolphins cajole fina | NULL
The next step is to create a list of users that should get the VIP status:
create table customers_to_prioritize as select custkey from customer tablesample bernoulli (0.5);Let’s check the current priority of the orders of the VIP customers:
select orderpriority, count(*) from orders where custkey in (select custkey from customers_to_prioritize) group by 1 order by 1;

  orderpriority  | _col1
-----------------+-------
 1-URGENT        |  7482
 2-HIGH          |  7499
 3-MEDIUM        |  7444
 4-NOT SPECIFIED |  7436
 5-LOW           |  7470
(5 rows)
The next step is the most interesting, the order priorities will be changed and the previous priority will be saved.
merge into orders as o
using customers_to_prioritize as c
on o.custkey = c.custkey
when matched
  then update set orderpriority_prev = orderpriority, orderpriority = '1-URGENT';
All the orders should have top priority now:
select orderpriority, count(*) from orders where custkey in (select custkey from customers_to_prioritize) group by 1 order by 1;

 orderpriority | _col1
---------------+-------
 1-URGENT      | 37331
(1 row)
But you can still access the previous priority. It should return the same counts as before.
select orderpriority_prev, count(*) from orders where custkey in (select custkey from customers_to_prioritize) group by 1 order by 1;

 orderpriority_prev | _col1
--------------------+-------
 1-URGENT           |  7482
 2-HIGH             |  7499
 3-MEDIUM           |  7444
 4-NOT SPECIFIED    |  7436
 5-LOW              |  7470
(5 rows)
Scaling up to larger amount of data
So far we have executed all the queries against a dataset created from TPC-H with a scale factor of 5. The demo is able to handle much larger data volumes.
This section describes how to scale up your environment to be able to drop and re-create the tables with a larger scale factor. After creating the tables you should be able to execute the above queries again without changing anything.
|
It is important that your Kubernetes cluster is large enough to handle the scale up.
If you are running e.g. on your local machine and try to spin up 8 Trino workers with 16GB RAM each chances are pretty high that Pods will be stuck in |
Scale S3
If you have access to a managed S3, e.g. from a Cloud provider where you have a good network interconnection to, that should be the preferred option.
You can change the endpoint of the S3 by running kubectl edit s3connection minio -o yaml and kubectl edit secret minio-s3-credentials. Please note that the credentials need to be base64 encoded.
Example IONOS configuration
apiVersion: s3.stackable.tech/v1alpha1
kind: S3Connection
metadata:
  name: ionos-sbernauer
spec:
  host: s3-eu-central-1.ionoscloud.com
  port: 443
  tls:
    verification:
      server:
        caCert:
          webPki: {}
  credentials:
    secretClass: ionos-sbernauer-s3-credentials
---
apiVersion: secrets.stackable.tech/v1alpha1
kind: SecretClass
metadata:
  name: ionos-sbernauer-s3-credentials
spec:
  backend:
    k8sSearch:
      searchNamespace:
        pod: {}
---
apiVersion: v1
kind: Secret
metadata:
  name: ionos-sbernauer-s3-credentials
  labels:
    secrets.stackable.tech/class: ionos-sbernauer-s3-credentials
stringData:
  accessKey: "<username>"
  secretKey: "<password>"
If you don’t have access to a managed S3 or don’t want to use it you can also scale up the MinIO cluster. You can see the available replicas using
$ kubectl get statefulsets.apps minio

NAME    READY   AGE
minio   2/2     4m16s
You can edit the MinIO cluster using kubectl edit statefulsets.apps minio.
Especially out of interest are the following options:
apiVersion: apps/v1
kind: StatefulSet
metadata:
  name: minio
spec:
  replicas: 5 # Number of MinIO nodes
  template:
    spec:
      containers:
      - name: minio
        resources:
          requests:
            cpu: 1000m # Guaranteed CPU available (one core in this case)
            memory: 4Gi # RAM available
E.g. set spec.replicas to 5 and save the changes.
You can re-run kubectl get statefulsets.apps minio to see the effect.
Scale Trino
Run kubectl edit trinocluster trino.
Modify the following settings to your needs:
apiVersion: trino.stackable.tech/v1alpha1
kind: TrinoCluster
spec:
  coordinators:
    config:
      queryMaxMemory: 10TB
      resources:
        cpu:
          max: "4" # CPU resources that can be used at a maximum
          min: "4" # Guaranteed CPU resources
        memory:
          limit: 6Gi # Available RAM
  workers:
    config:
	  # This limit can't be to big as otherwise the workers won't start.
	  # I suggest setting it to half of spec.coordinators.config.resources.memory.limit
      queryMaxMemoryPerNode: 6GB
      resources:
        cpu:
          max: "12" # CPU resources that can be used at a maximum
          min: "12" # Guaranteed CPU resources
        memory:
          limit: 16Gi # Available RAM
    roleGroups:
      default:
        replicas: 8
Afterwards save your changes.